6.5 The Values View / Setting Fixture Values
The Values View, also referred to as the Programmer, is where you can make live changes to fixture parameters before saving them into a Cue or Preset. Think of it as a temporary workspace where adjustments take effect immediately but are not stored until you decide to save them.
EDGE organizes fixture attributes into distinct groups, such as Intensity, Position, Color, Gobo, Beam, and Special, providing an intuitive and efficient way to manage your fixtures. Each attribute group contains multiple parameters that can be adjusted using encoders, presets, color picker or direct input.
Altering fixture parameter values is best done within the Values View as it also provides an overview of the current values. However, it is also possible in any other View of the Home Screen using the encoders or Presets. If you have an external monitor attached, you can modify fixture values at any time by using the Presets on the external screen. Additionally, for color adjustments, you can use the Color Picker to select a hue visually or choose from predefined Gel Swatches to match industry-standard colors.
Unlike Playbacks, which recall pre-recorded cues, the Values View always takes precedence over Playbacks. This means any changes you make in the Programmer will override the current output on stage, allowing you to fine-tune looks in real time without modifying stored cues.
There are different states of values within the Values View, each behaving differently. These will be explained in greater detail below.
To open the Values View, make sure the Home screen is shown, and select Values from the top bar.
6.5.1 The Values View Context Menu (Magic Wand Button)
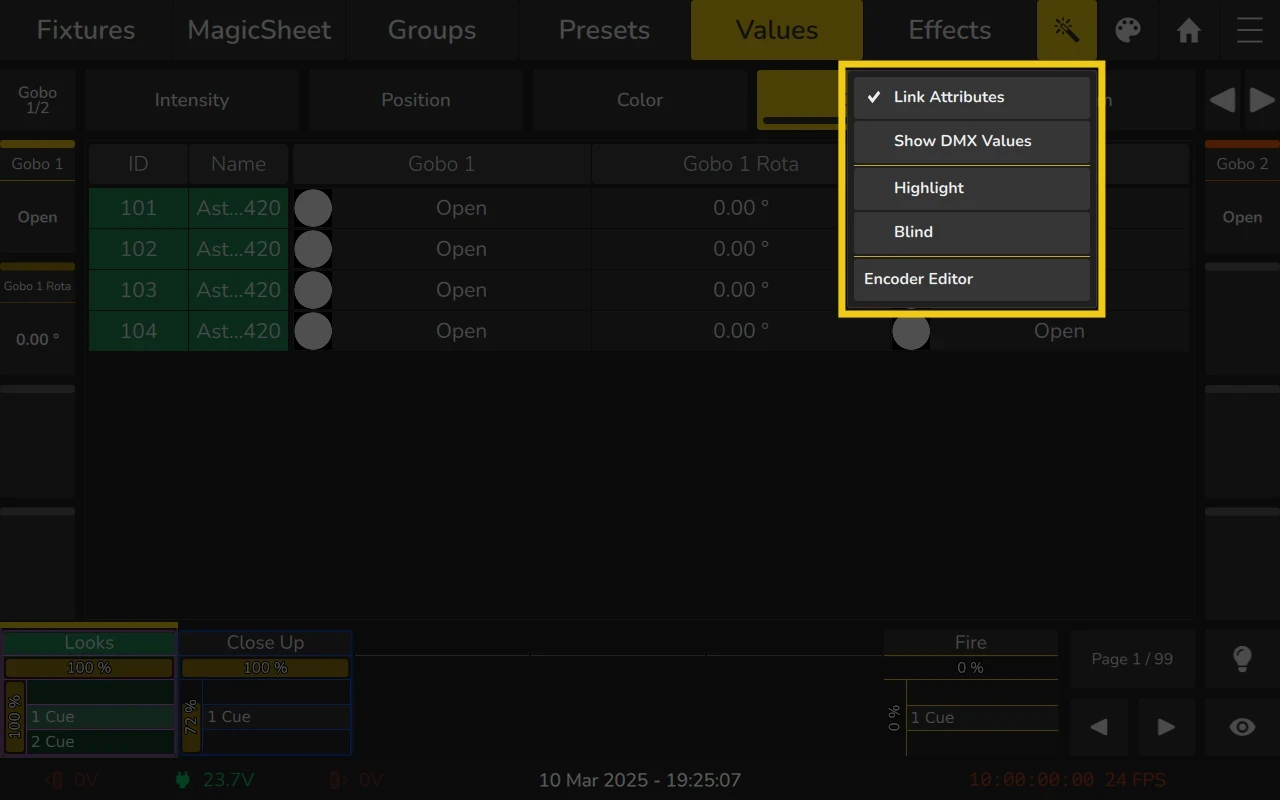
You can access this menu by clicking the Magic Wand  button within the Values View. The menu includes the following options:
-
Link Attributes
This convenience function automatically touches all related parameters within the Color or Position attribute groups when one of them is adjusted.
For example:- Touching the Cyan parameter will automatically touch Magenta and Yellow as well.
- The same applies to Hue & Saturation, Red, Green & Blue, and Pan & Tilt.
This ensures that all relevant parameters are adjusted together, preventing unintended partial changes.
-
Show DMX Values
Enabling this option displays DMX values for fixtures in the Values Table and on the Encoders, instead of percentage-based or descriptive ranges. -
Highlight
Pressing the Highlight button temporarily sets the selected fixtures to a “Full On, Open White” state. Attributes like Gobo will also be set to open or to the value defined as the Highlight Value in the fixture library.
This function is linked to the Highlt button on the front panel. -
Blind
When Blind Mode is enabled, any changes made in the Programmer will not be output live. This allows you to prepare a look for later use or edit a cue without affecting the current stage output.
This function is linked to the Blind button on the front panel. -
Encoder Editor
Opens the Encoder and Feature Group Editor, allowing customization of encoder assignments and parameter organization.
For more details, see the Encoder Editor section in the Patch chapter.
6.5.2 Different States of Values
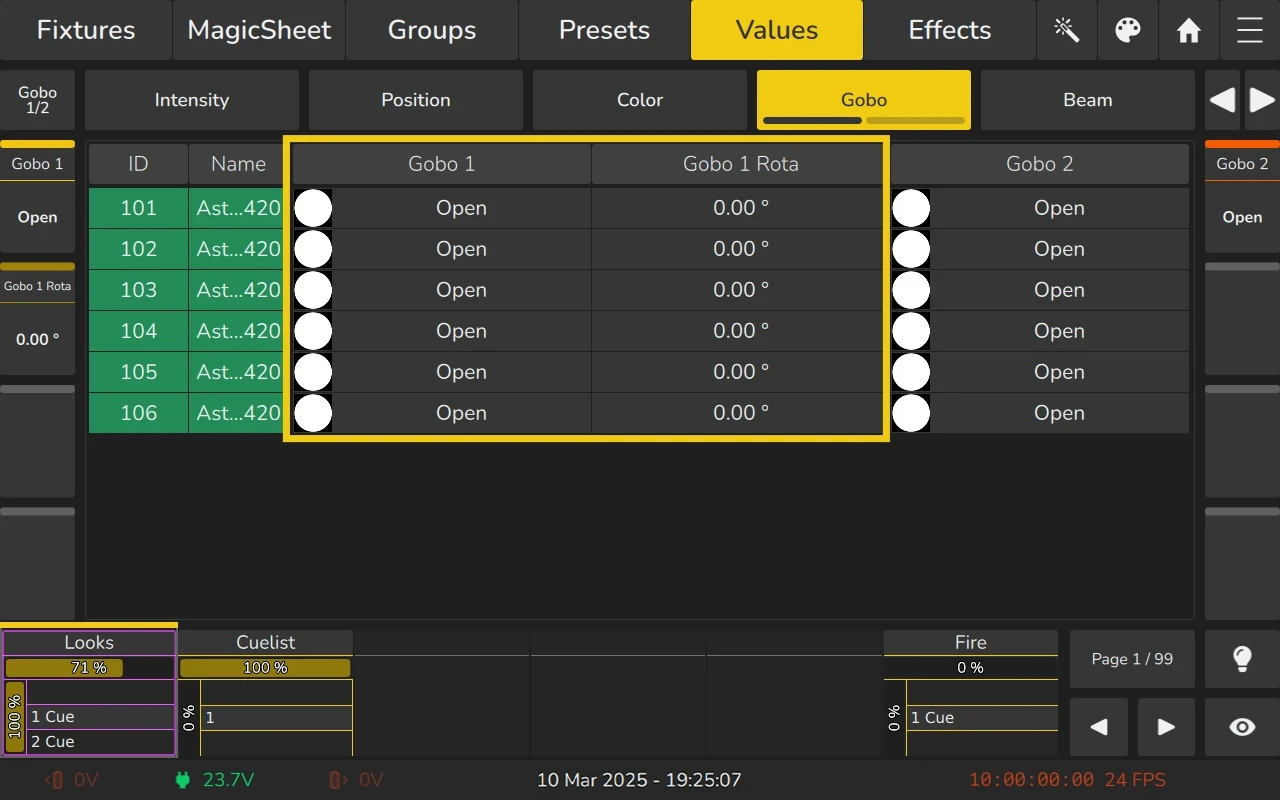
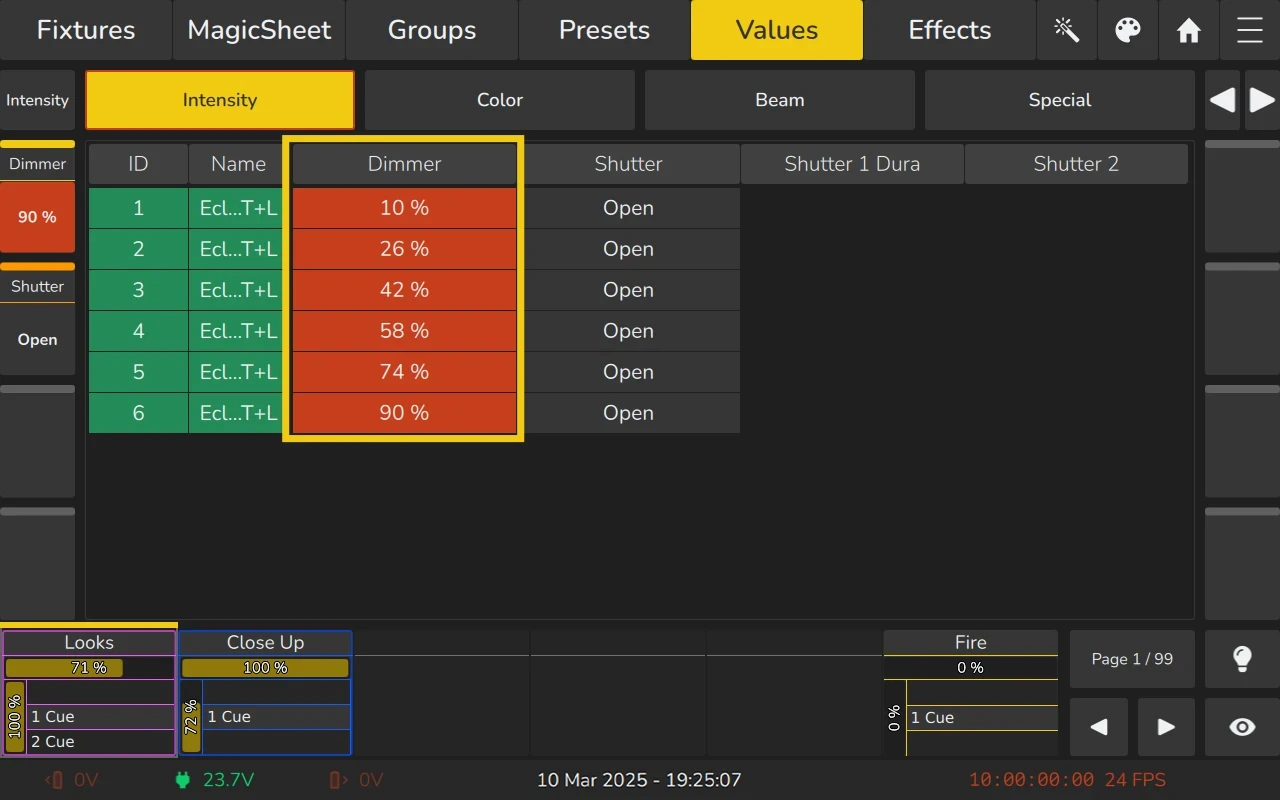
Selected Fixtures and No Assigned Values
This image shows how the programmer appears when fixtures are selected, but no values have been assigned to them. In this case, the fixtures are still outputting values set by Playbacks or their default values from the library. The values currently being output are displayed in grey.
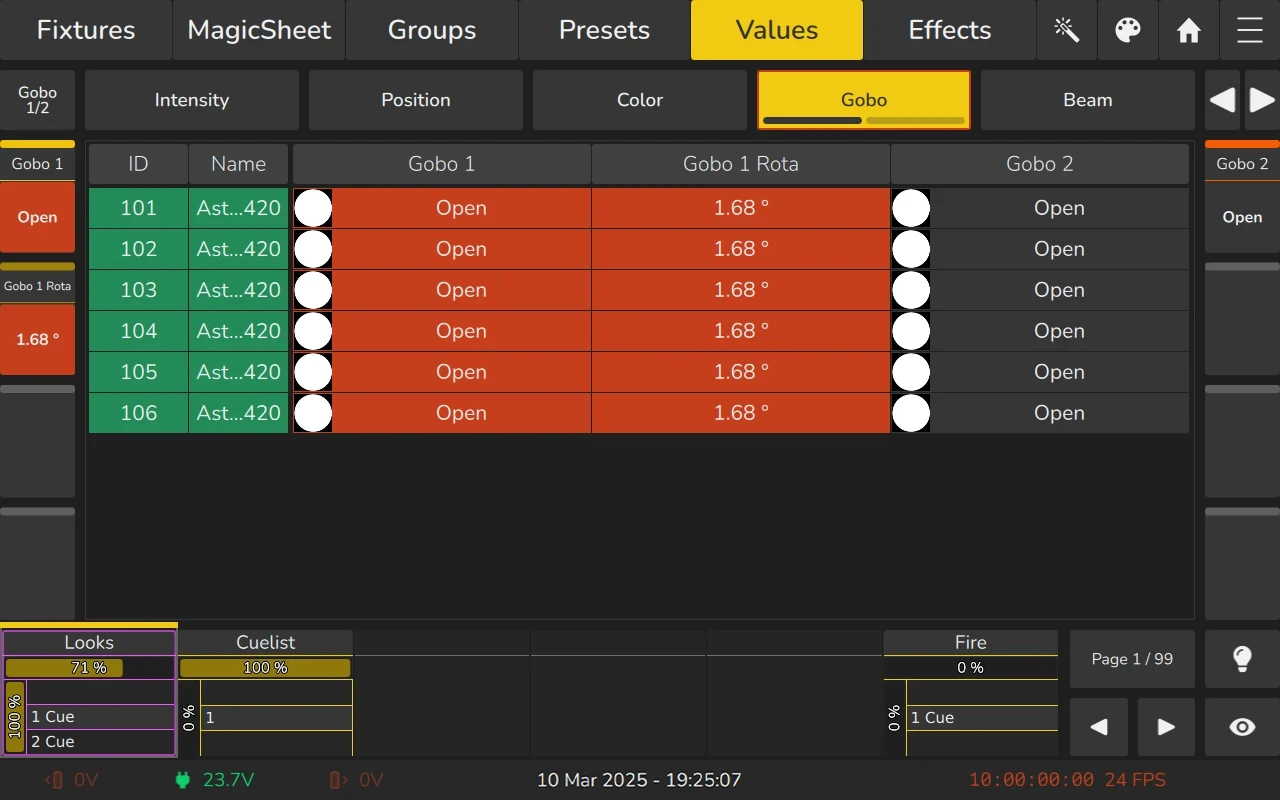
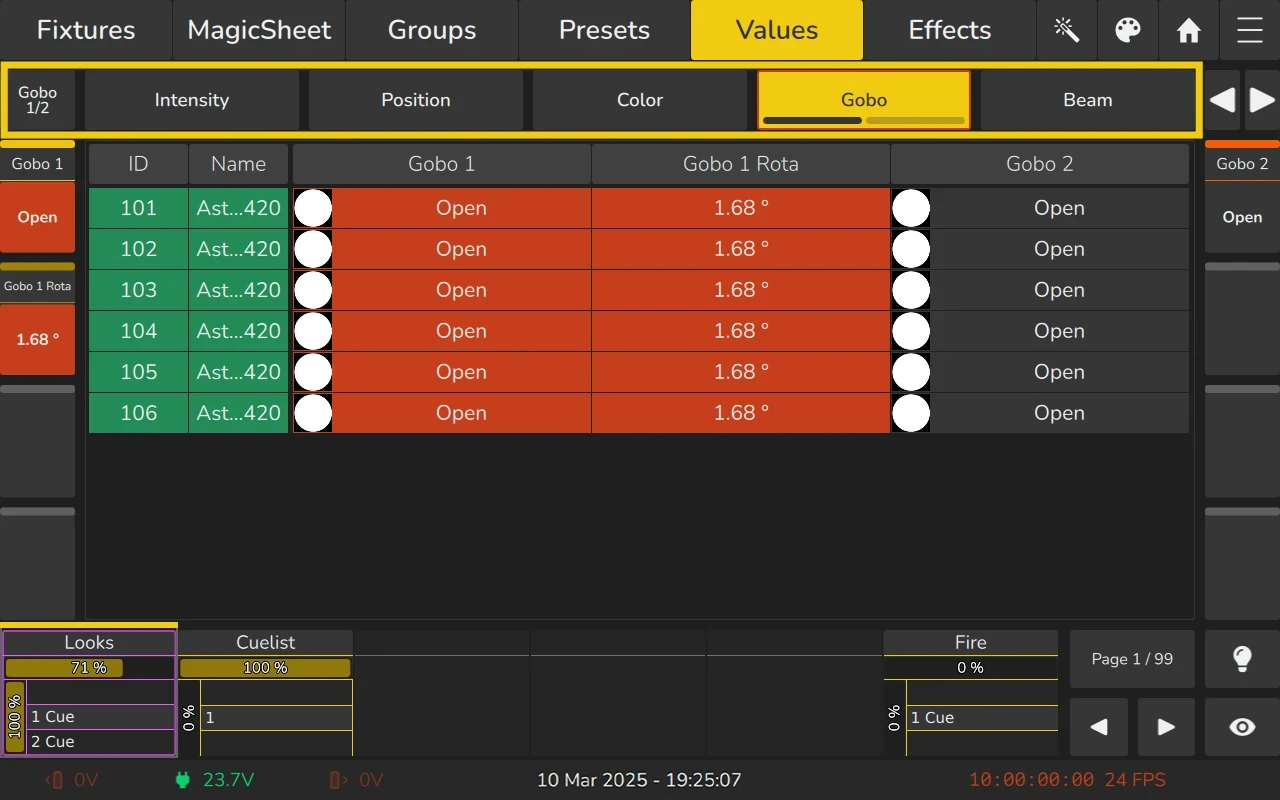
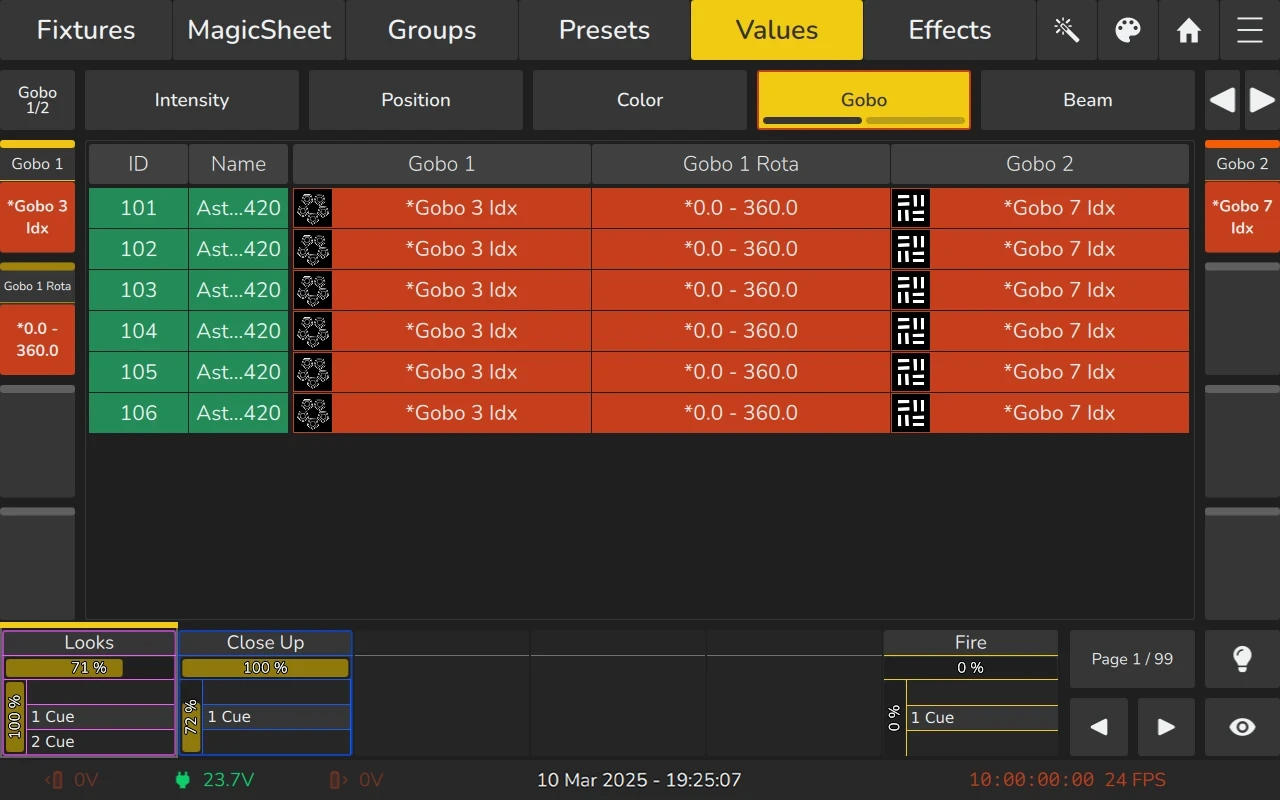
Selected Fixtures and Assigned Values
This image shows how the programmer appears when fixtures are selected, and values are assigned in the programmer. The programmer takes precedence over Playback output for the attributes that have values in the programmer. These values are indicated by red text on the default background color.
However, note that these values are not recorded.
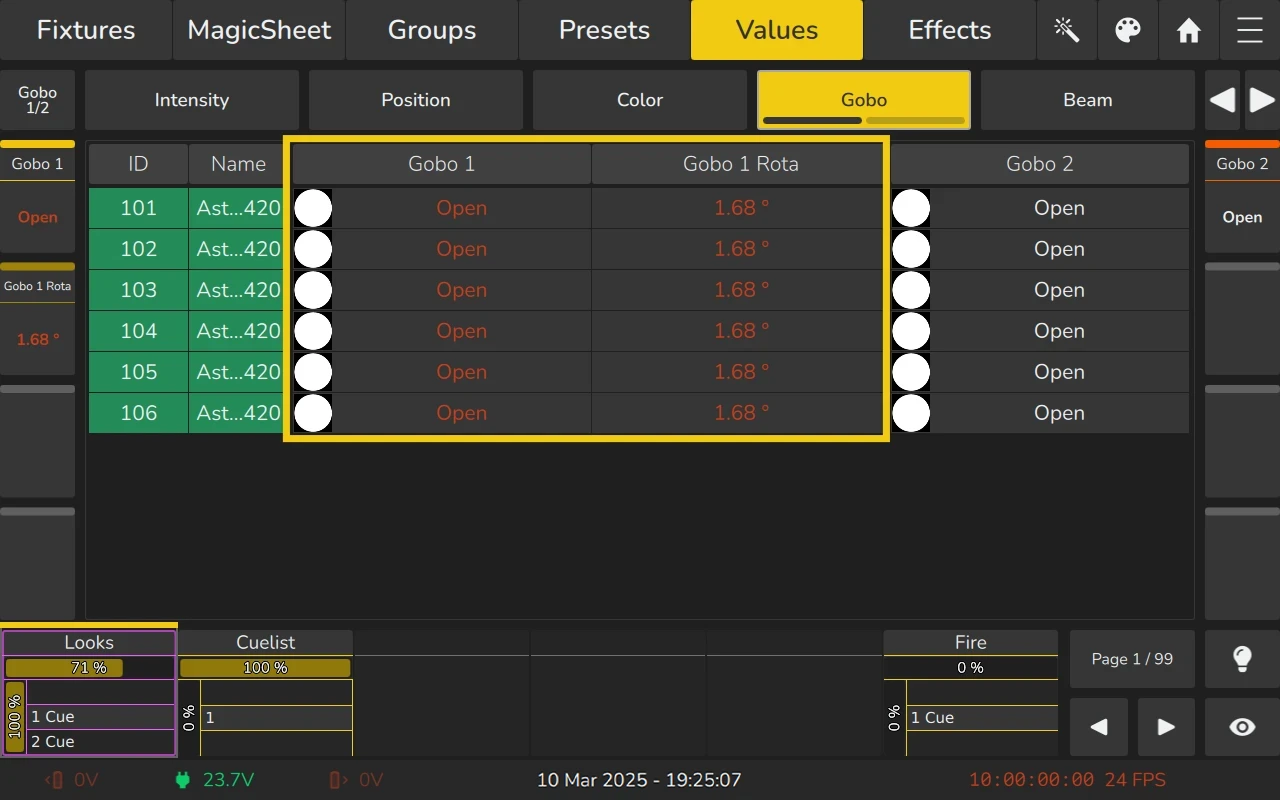
Modified (Touched) Values
This image shows how the programmer appears when you have modified (touched) the values of an attribute in the programmer. The programmer takes precedence over Playback output for all attributes with values in the programmer.
Once values are “touched” (indicated by a red background and white text color in the corresponding cell), they can be recorded.

6.5.3 Emptying the Values View Content / Clearing the Programmer
To allow Playbacks to regain control over fixture attributes in the Programmer, the Programmer must be cleared. This process occurs in three steps, with each press of the Clear key:
- First press - Un-touches all values, meaning they are no longer considered actively adjusted. However, they remain in the Programmer and continue to override Playbacks.
- Second press - Removes all values from the Programmer, allowing Playbacks to take control again.
- Third press - Unselects all fixtures that were previously selected.
In short, pressing Clear + Clear + Clear will completely clear the Programmer.
Alternatively, you can hold the Clear key for a longer period to achieve the same result in one action.
If you accidentally clear the Programmer, you can undo the last clear command by pressing EDGE and Clear at the same time.
6.5.4 Blind Function
When Blind Mode is enabled, any changes made in the Values View will not be output on stage. This allows you to prepare a look for later use or make edits to a cue that is not currently being played back.
Blind remains active until you manually deactivate it.
To enable or disable Blind Mode, you can:
- Press the Blind button on the front panel.
- Select "Blind" from the Magic Wand Menu in the Values View.
- Click the Blind
 button, indicated by an eye icon, in the bottom toolbar.
6.5.5 Highlight Function
Pressing the Highlt button temporarily sets the selected fixtures to a Full On, Open White state. It also adjusts attributes like Gobo and other effects to either open or to the value defined as the Highlight Value in the fixture library.
When to Use Highlight Mode
This function is useful when you need to:
- See the beam of a fixture on stage, such as during position focusing.
- Quickly build fixture groups.
- Step through selected fixtures to find a specific one.
Highlight also applies to sub-selections, meaning you can step through fixtures one by one using the Previous  or Next
  button, located above the encoders and below the top toolbar on the right side of the screen.
Important Notes
- Highlight only changes attribute values in the output—it does not affect the current cue or the Programmer.
- If Highlight Mode is active while recording a cue, the values set by Highlight will not be recorded.
- Highlight remains active until you manually disable it.
How to Enable or Disable Highlight Mode
- Press the Highlt button on the front panel.
- Select "Highlight" from the Magic Wand Menu in the Values View.
- Click the Highlight
 button in the bottom toolbar.
How to Use the Highlight Function
- Select some fixtures.
- Press the Highlight button in the bottom toolbar. The fixtures will keep their position, but other attributes may change to the highlight values set in the library.
- Use the Previous or Next button to step through the fixtures one at a time.
6.5.6 Adjusting Fixture Values
Feature Groups and Feature Sub Groups
The fixture functions displayed on the encoder labels and in the Values View, which are controlled by the encoders, are organized into different feature groups:
- Intensity
- Position
- Color
- Gobo
- Beam
- Special
Each feature group may contain subgroups, which function like pages within a feature group.
Selecting a Feature Group
To select a feature group, such as Gobo, you can:
- Press the Gobo button in the feature group toolbar.
- Press the Gobo button on the front panel.
The encoders will now display the first sub-feature group in the Gobo group.
If multiple subgroups exist, you can cycle through them by:
- Repeatedly pressing the Gobo button in the feature group toolbar.
- Pressing the Gobo button on the front panel again.
Accessing a List of Subgroups
You can also long-press the small button on the left side of the screen, located between the top toolbar, to open a menu listing all sub-feature groups.
Customizing Feature Groups
You can customize how functions are mapped to feature groups and subgroups in the Encoder Editor. See The Encoder Editor section for more details.
Quickly setting selected fixtures to full intensity
You can quickly set selected fixtures to 100% intensity by double-pressing the EDGE key. This function behaves similarly to the @ Full command found on consoles with a full number block and command line interface.
Adjusting Fixture Values Using the Encoders
Once you have selected the desired feature and feature subgroup, you can adjust the corresponding fixture values by turning the encoder next to the on-screen encoder label. This label will display the assigned function and the values for the last fixture in your selection. The encoders are backlit, and the on-screen labels will match the colors of the encoders for easy identification.
- Turn the encoder to the left to decrease the value.
- Turn the encoder to the right to increase the value.
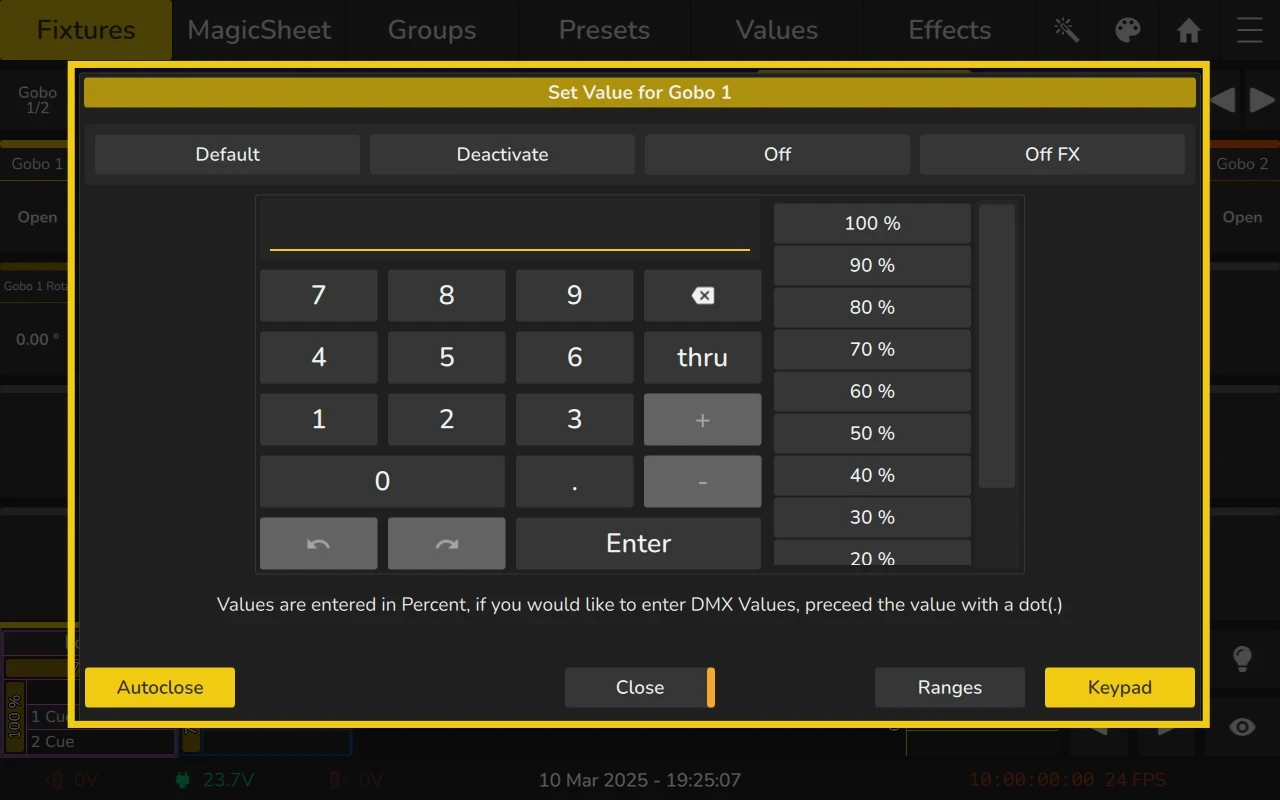
When you press on the encoder, a dialog called the “Set Value Dialog” will appear. This allows you to:
- Enter values directly in either percent or DMX.
- Fan, or spread, values directly using the on-screen keypad.
- If applicable, a list of ranges will be shown, which you can select from directly.
- The dialog also contains other useful shortcuts for modifying values. For more information, please refer to the section titled “Set Value Dialog”.
Fine Adjustments
Pressing the EDGE key allows you to adjust values with greater precision and accuracy by using the encoders. If Show DMX Values is turned on in the Context Menu, you will be able to see the coarse and fine channel values within the values table.

Fanning / Spreading Values
Fanning is a very useful function for distributing values across a range of fixtures. It can be applied to any fixture attribute and most effect attributes.
The fixture selection order is crucial when applying the fanning function, as it determines how the values are distributed across the selected fixtures.
Additionally, fan modes and further options, such as fanning in groups or buddying, can be selected within the Tools Menu. Keep in mind that these settings will be reset once the Programmer is cleared. For more details on these options, please refer to the section titled "The Tools Dialog."
To activate the fanning function:
- Press the Fan key on the console’s faceplate.
- The Encoder Labels will display "Fan" to indicate that the fanning function is active.
The fan function will remain active until you press the Fan key again. If you hold the Fan key for a longer period, the fan function will only stay active as long as the button is held.
Using the Set Value Dialog
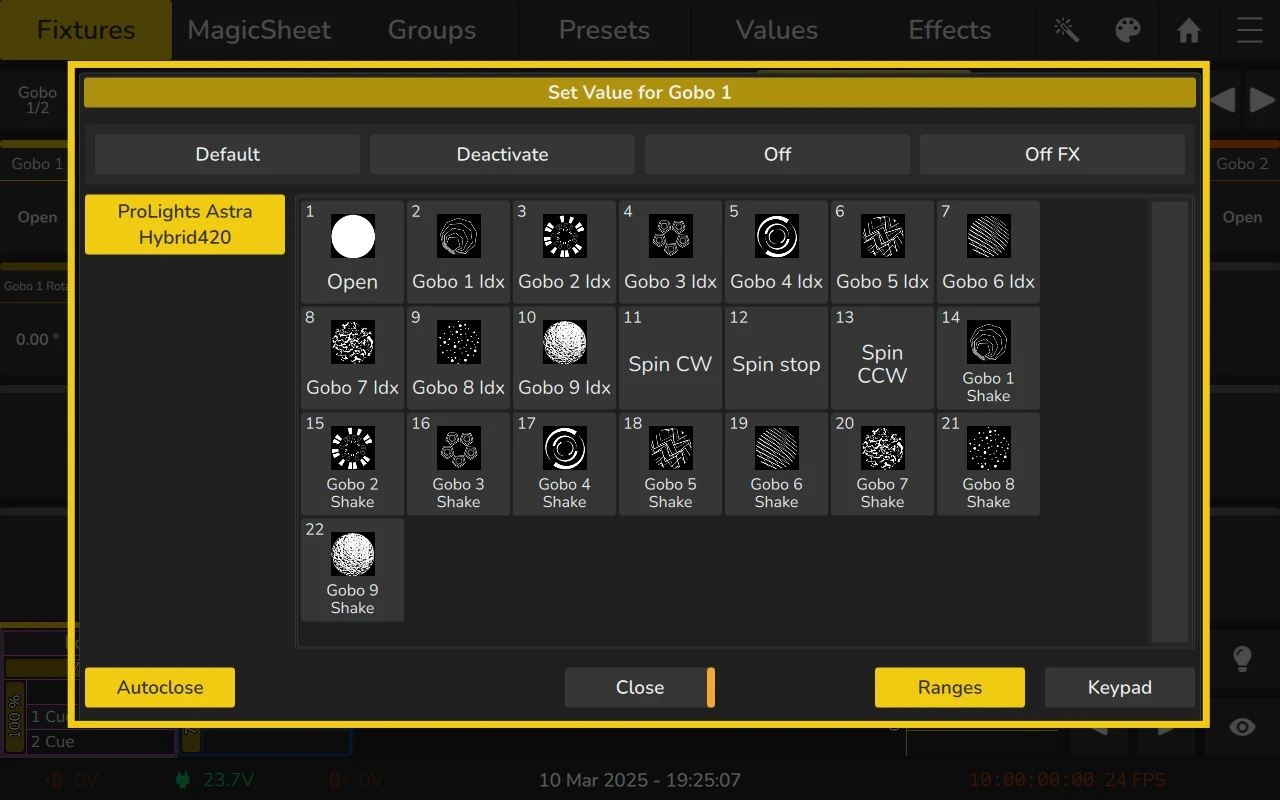
To select values directly for all selected fixtures from the predefined ranges in the fixture’s library, simply press the appropriate encoder and choose a value from the pop-up screen.
If you want to set values for specific fixtures, you can select multiple cells in the Values Table and either double-click or long-press to open the Set Values Dialog for the selected cells only.
If the selected function includes predefined ranges, additional buttons will appear along the bottom edge of the Set Values Dialog. These buttons allow you to switch between an on-screen Keypad for manual value entry or a list of available Ranges, grouped by fixture type, for quick selection.
The toolbar of the Set Values Dialog contains several useful functions to assist with value adjustments.
| Button | Function |
|---|---|
| Default | Used to set the values of this attribute to the default values defined in the Fixture Library. |
| Deactivate | Used to “Deactivate” / “Un-Touch” the values of this attribute, so that it is not recorded - but still output. |
| Off | Removes the values of this attribute. |
| Off FX | Sets an “Off-Effect” form for this attribute. |
Entering Values using the On-Screen Keypad
When the Keypad Button, located along the bottom edge of the Set Values Dialog, is selected, the dialog will display a keypad for direct value entry. Additionally, it provides a list of predefined values for quick selection on the right side of the keypad.
If the selected fixture function does not contain any predefined ranges, only the keypad will be shown.
By default, values entered in the dialog are in percent (%). To enter DMX values, prefix the value with a dot (.) before pressing Enter.
For example:
- Entering 10 followed by Enter will set the function to 10%.
- Entering .10 followed by Enter will set the function to a DMX value of 10.
You can also fan values directly by entering a range of values using Thru:
- Entering 10 thru 50 followed by Enter will spread the functions values from 10% to 50%.
- Entering .10 thru 50 followed by Enter will spread the functions values from DMX 10 to 50%.
When fanning in the keypad, the grouping and buddying settings defined in the Tools Dialog are respected as well.
Entering Values using a list of Ranges defined in the fixture library
When the Ranges Button, located along the bottom edge of the Set Values Dialog, is selected, the dialog will display a pool with the ranges defined in the fixture library, including colors and icons.
If the selected fixture function does not contain any predefined ranges, only the keypad will be shown.
You can select values by simply clicking on an item in the pool.
Setting Values using Presets
You may also use Presets to set fixture values. Whenever a Preset is selected for a function, the Values View shows the name of the Preset prefixed by an Asterisk.
For more information on how to use Presets to set values, please see section 6.4.4 Working with Presets.
Setting Values using the Color Picker Screen
You can select color values graphically using the Color Picker. The Color Picker attempts to calibrate the selected color based on the emitter data stored in the fixture library. This ensures more accurate color representation across different fixture types.
For more details, please refer to 6.7 The Color View.
Loading all Values from Current Output for all functions of selected fixtures
To capture all values currently being output for the selected fixtures, including default values, hold down the EDGE key and press the Edit key simultaneously.
This action will retrieve all values, including effects, from the console’s output, but it does so before any Group Master Dimmers are applied.
Loading all Values for a specific Attribute Group from Current Output
To capture all values currently being output for a specific feature group for the selected fixtures, including default values, press the Edit key, then press the desired feature group key (Intensity Position Color Gobo Beam Special) on the front panel.
This action will retrieve all values without effects for the selected fixtures within the chosen feature group, directly from the console’s output, but before any Group Master Dimmers are applied.