5.2 The Fixture Patch
The Fixture Patch Table is used to manage fixtures within the showfile. It provides a comprehensive overview of all fixtures, including their assigned addresses, fixture types, and other relevant information. From the Patch Table, you can perform several functions, including adding, patching, deleting, or importing fixtures into the showfile.
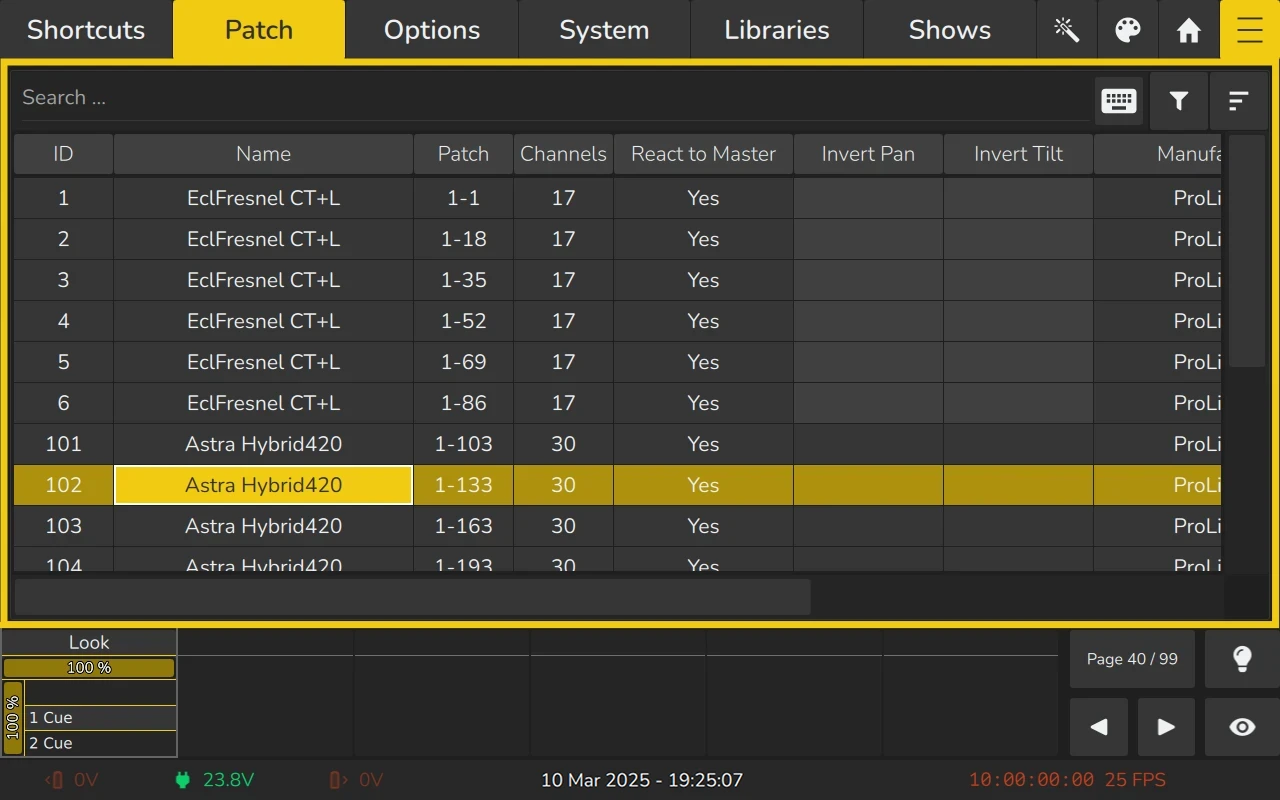
The following columns are shown (in the order from left to right):
| Caption | Description |
|---|---|
| ID | This column shows the ID of the fixture. This is a unique number which may be used for indicating which fixture is which. Double clicking allows you to change the fixture ID. |
| Name | User given Name of the Fixture within the show file. Double clicking allows you to change the name of the fixtures. |
| Patch | Indicates the fixtures DMX Address (Universe – Channel). Double clicking allows you to change the address. |
| Channels | Amount of DMX channels this fixture occupies. |
| React to Master | Defines if this fixture should react to the Grand Master Fader. Double clicking inverts the current value. |
| Invert Pan | Indicates if Pan is inverted. Double clicking inverts the current value. |
| Invert Tilt | Indicates if Tilt Inverted. Double clicking inverts the current value. |
| Manufacturer | This is the Manufacturer of the Fixture Type. |
| Type | This column displays the Fixture Type. |
| Mode | DMX Mode of the Fixture. |
| Instances | Displays the number of instances. |
5.2.1 The Patch Magic Wand Menu
The Patch Menu is accessed by clicking the Magic Wand  button in the top toolbar. It provides a set of functions for managing fixtures within the Patch window. Most of the options in this menu apply to the currently selected fixtures. You can select fixtures by clicking and dragging within the Patch Table or using other fixture selection methods before choosing a function from the menu.
The available options in the Patch Menu include "Add Fixtures," "Open Feature Group Editor," and "Import Patch CSV," which are not dependent on fixture selection. However, other options will only affect the fixtures you have selected in the Patch Table.
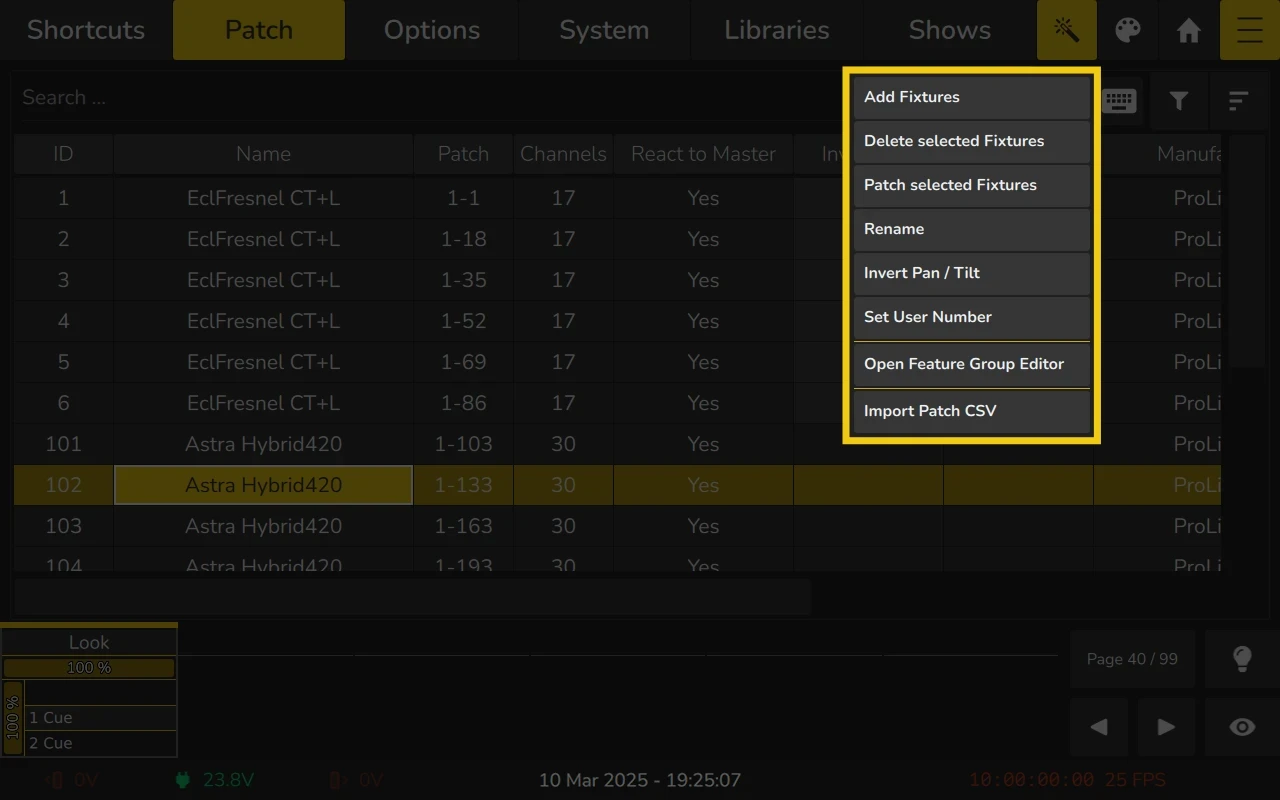
Below you can find a more detailed explanation of the options contained in the menu:
| Button | Function |
|---|---|
| Add Fixtures | Is used to add fixtures to the show |
| Delete selected Fixtures | Is used to delete selected fixtures from the showfile. |
| Patch selected Fixtures | Is used to change the DMX Address of one or more selected fixtures. |
| Rename | Is used to change the name of one or more selected fixtures. |
| Invert Pan / Tilt | Is used to invert Pan or Tilt of one or more selected fixtures. |
| Set User Number | Is used to change the ID of one or more selected fixtures. |
| Encoder Editor | Is used to move functions to other feature or sub feature groups and can be used to edit the encoder mapping and colors of each function. |
| Import Patch CSV | Can be used to import patch information via a CSV file. |
5.2.2 Adding Fixtures to the Show file
- Open the Action Menu by pressing the Magic Wand button.
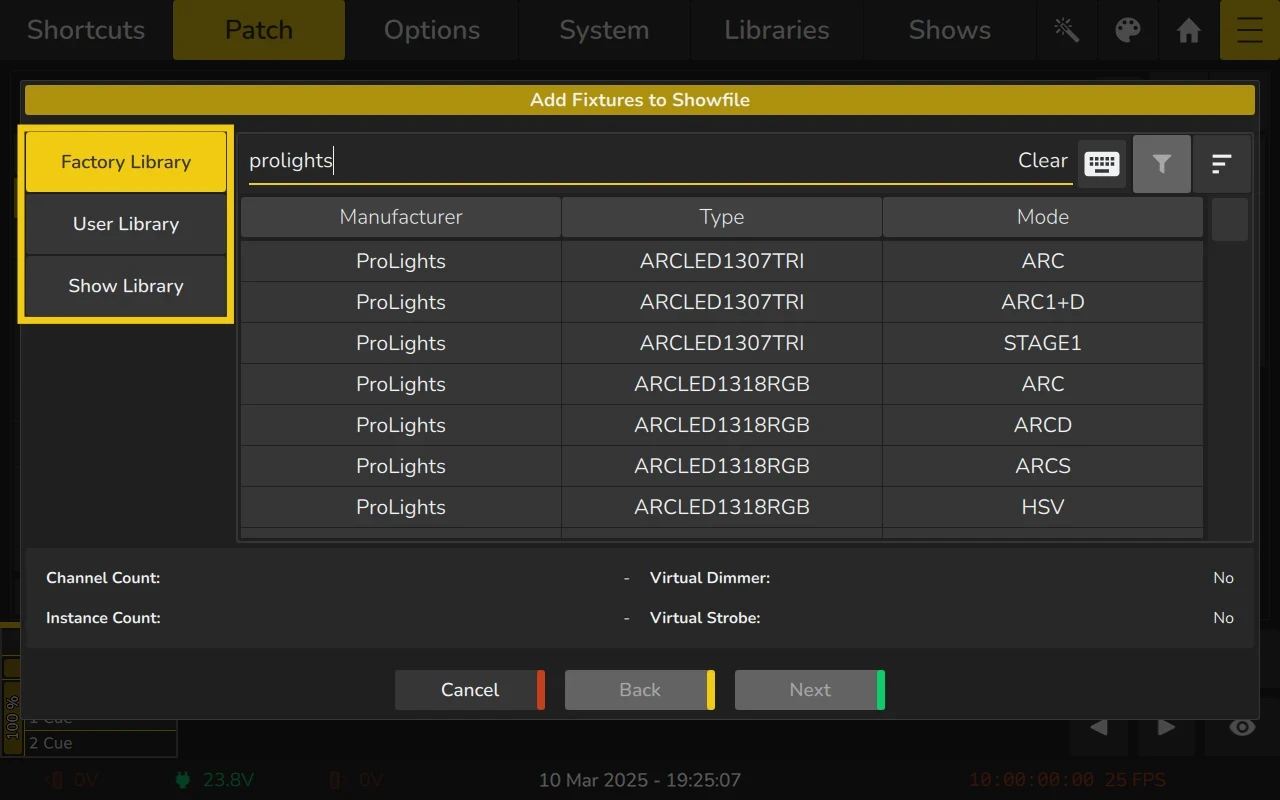
- Click on Add Fixtures. A dialog as pictured below is shown.
-
To add a fixture from the library supplied with the console, select Factory Library.
If you want to add a user created Library, click on User Library.
If you want to add fixtures from the show library, select Show Library. -
Select a fixture type from the table. You may use the search bar to narrow down your search. Once a fixture type has been selected, the info box below the table will show additional information.
-
After selecting the Fixture type, click on Next.
-
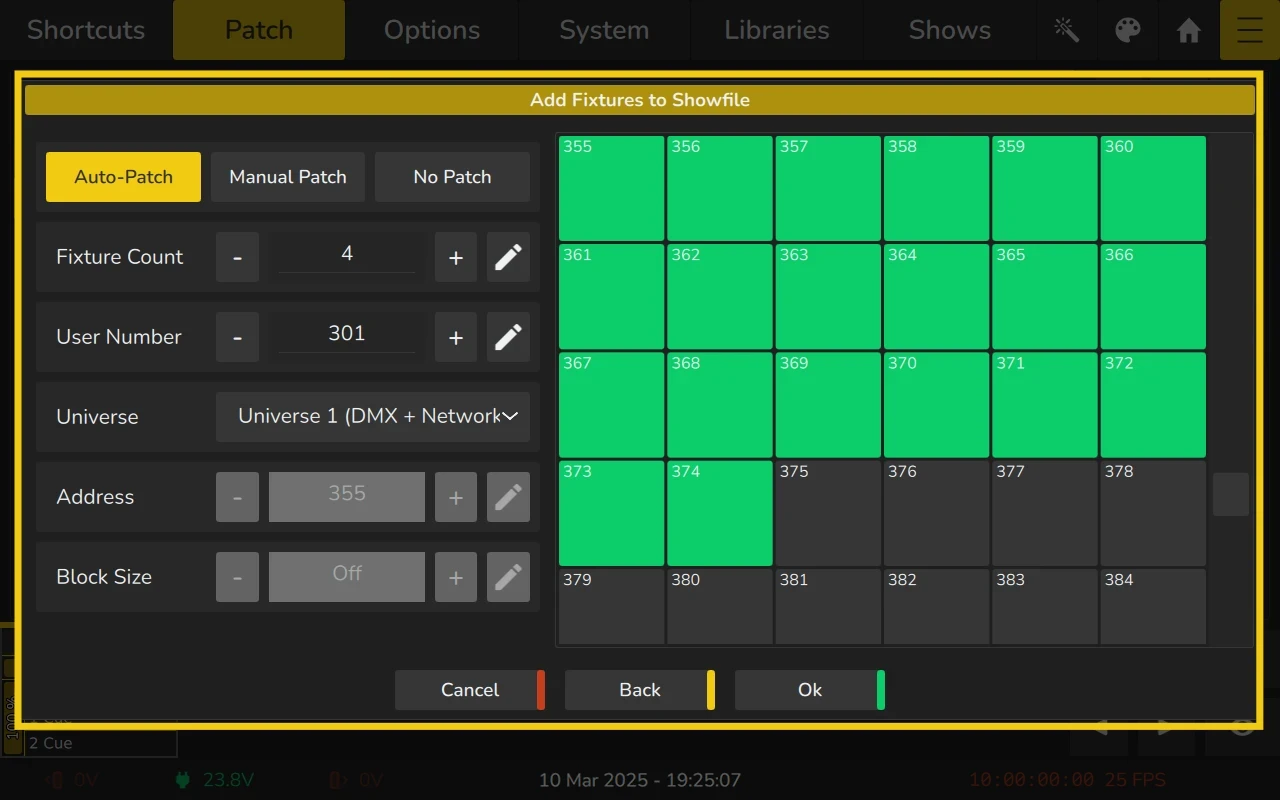
The “Add Fixtures to Showfile” dialog will be shown.
This screen offers the possibility to define the amount of fixtures, starting user number and to select if you would like to do an Auto-Patch, Manual Patch, or No Patch.
Auto Patch will patch the fixtures automatically onto the selected universe using the last free address on that universe.
Manual Patch allows you to specify the universe, start address and patch offsets between fixtures using the Block Size option. You can also select addresses in the preview displayed on the right side of the dialog.
No Patch will leave the fixtures without any DMX assignment. -
Click on OK when done.
- A confirmation dialog containing the patched fixtures count will appear, click Ok.
The added fixtures will appear on the patch table. The console will automatically add the patched Fixtures to the Fixtures View.
5.2.3 Delete Fixtures from the Show file
- Select the fixtures you wish to delete in either the Patch Window or by any of the other methods.
- Open the Action Menu by pressing the Magic Wand button.
- Click on Delete Fixtures. A window asking you to confirm the action will be shown. click on Yes, delete! To continue. Or click on Cancel to abort.
- When deleting fixtures, an information dialog will be shown. Click on Ok to close this dialog.
5.2.4 Change the DMX Address / Patch of existing Fixtures
- Select the fixtures you wish to change the address of, in either the Patch Window or by any of the other methods.
- Open the Action Menu by pressing the Magic Wand button.
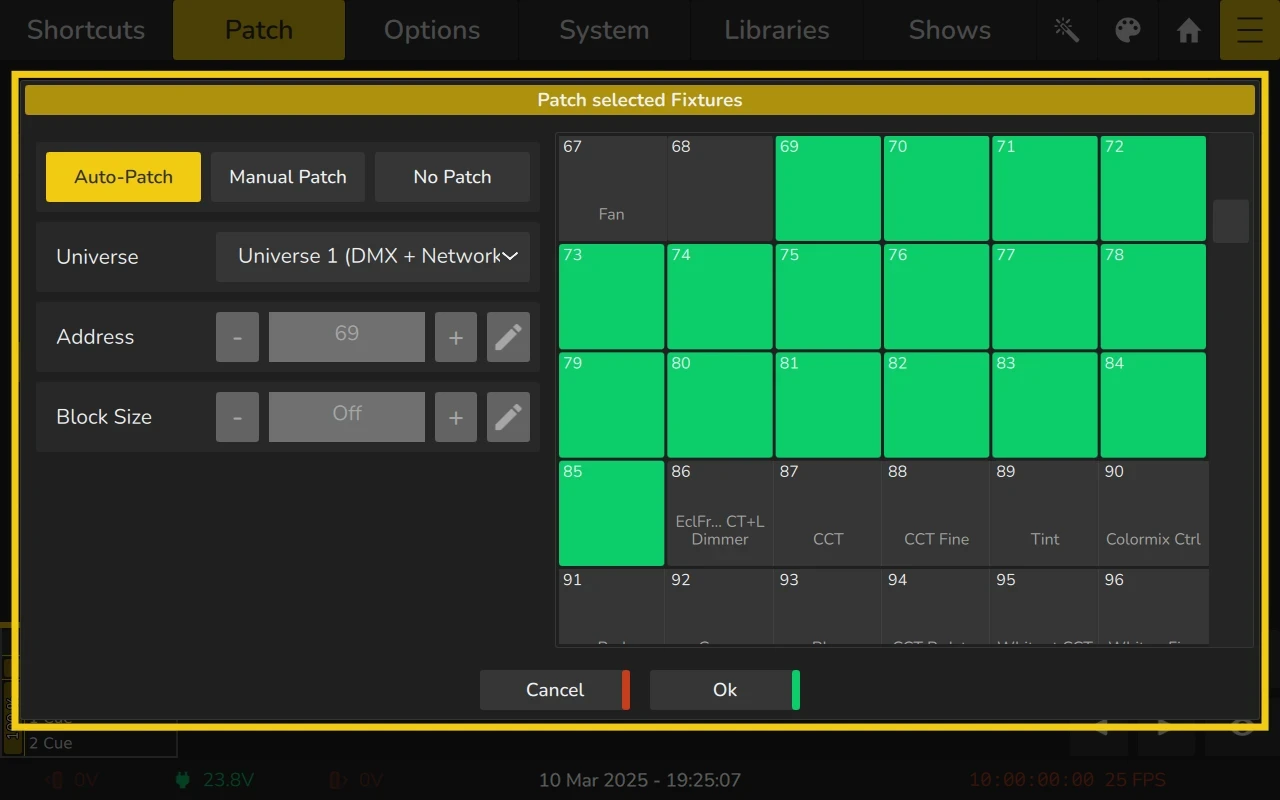
- Click on Patch Fixtures. The “Patch selected Fixtures” screen is shown. Select the Universe and Auto-Patch, Manual Patch, or No Patch:
- Auto Patch, will patch the fixtures automatically onto the selected universe using the last free address on that universe.
- Manual Patch allows you to specify the universe, start address and patch offsets between fixtures using the Block Size option. You can also select addresses in the preview displayed on the right side of the dialog.
- No Patch, will leave the fixtures without any DMX assignment.
- Click on Ok when done.
Within the Patch Table, you can also change the fixture patch by double clicking on the cell of the patch column to set new values.
5.2.5 Rename existing Fixtures
- Select the fixtures you wish to change the name of in either the Patch Window or by any of the other methods.
- Open the Action Menu by pressing the Magic Wand button.
- Click on Rename. An On-Screen Keyboard will be shown.
- Type the new Name of the Fixture using the On-Screen Keyboard or using a USB-Keyboard.
- Click on Ok to rename the selected fixtures.
Within the Patch Table, you can rename a Fixture by double-clicking on the cell of the Name column to set the new name.
When changing the name of a Fixture with multiple instances, the system will automatically rename all of its instances.
5.2.6 Invert Pan or Tilt for existing Fixtures
- Select the fixtures you wish to change the Pan / Tilt Invert of in either the Patch Window or by any other methods.
- Open the Action Menu by pressing the Magic Wand button.
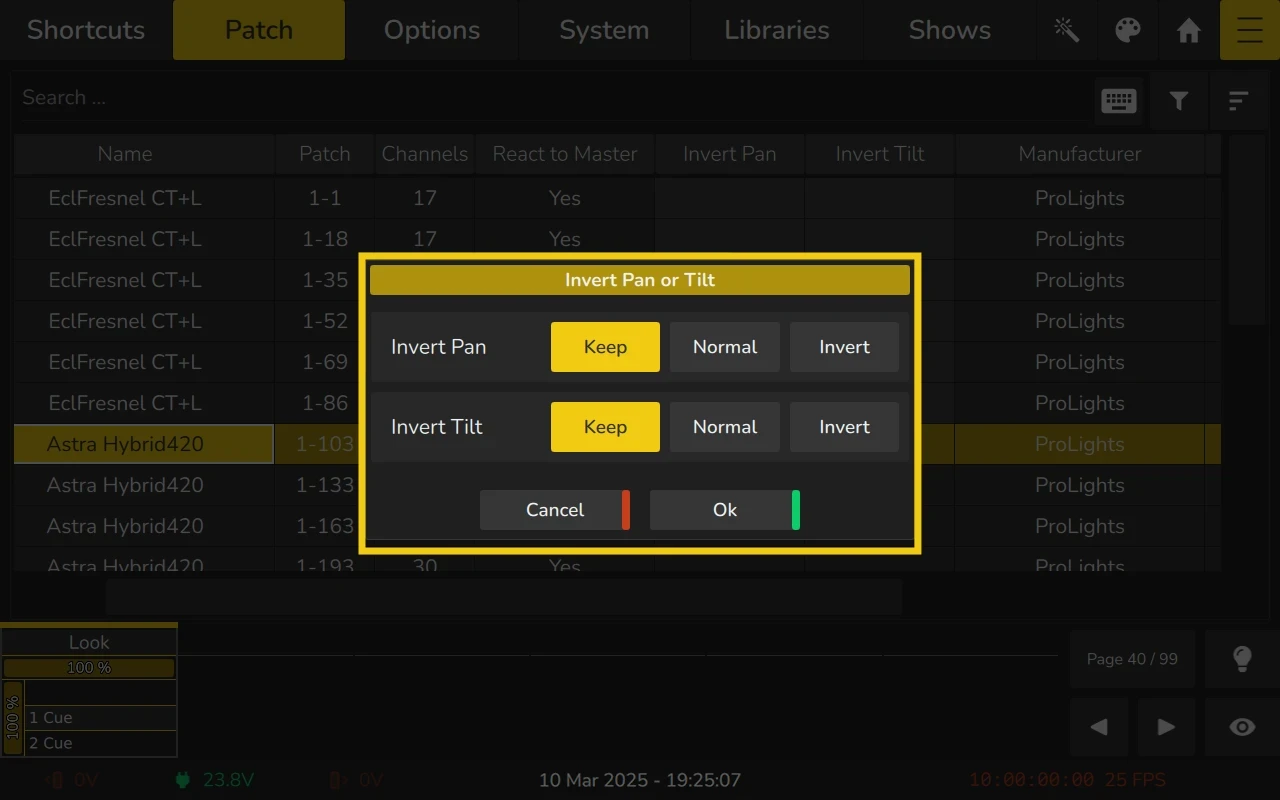
- Click on Invert Pan / Tilt. The following window will be shown.
- Set the new values for Pan and Tilt Invert by selecting the desired option.
- Click on Ok to apply changes.
Within the Patch Table, you can also double click on either the cell of Invert Pan or Invert Tilt to set new values.
5.2.7 Change User ID for existing Fixtures
- Select the fixtures you wish to change User ID of in either the Patch Window or by any of the other methods.
- Open the Action Menu by pressing the Magic Wand button.
- Click on Set User Number.
- Set the new values for the User Number of the Fixture.
- Click on Ok to accept the changes. Within the Patch Table, you can also change the Fixture ID by double clicking on the ID cell to set a new value.
When changing the user ID of a Fixture with multiple instances will automatically enumerate all its instances.
5.2.8 Encoder Editor
The Encoder Editor button can be found by clicking on the Magic Wand button in the top toolbar. The Encoder Editor allows you to fully customize the organization and behavior of your encoders, providing a personalized and efficient programming experience. With this feature, you can create your own feature sub-groups to better organize fixture attributes, ensuring that your workflow matches your specific needs.
Functions can be reassigned between feature groups, such as moving a function from Special to Color. When doing so, any cue timings associated with the function will automatically update to match the settings of the new group. For example, if a fade time in Special is 1 second but Color uses 3 seconds, the function will adopt the 3-second fade time once moved.
You can assign a function to multiple sub-groups within the same feature group, offering flexibility, though a function cannot exist in multiple feature groups at the same time. The mapping of functions to encoders is entirely editable, as is the ability to assign custom colors to functions for better visual identification.
To support portability and reuse, the Encoder Editor also enables you to export your custom mappings to a USB drive (or potentially save them locally), making it easy to transfer settings between different show files.
This feature gives you comprehensive control over your encoder setup, enhancing your ability to program with precision and ease.
Below you can find a more detailed explanation of the options contained in the Encoder Editor:
| Button | Function |
|---|---|
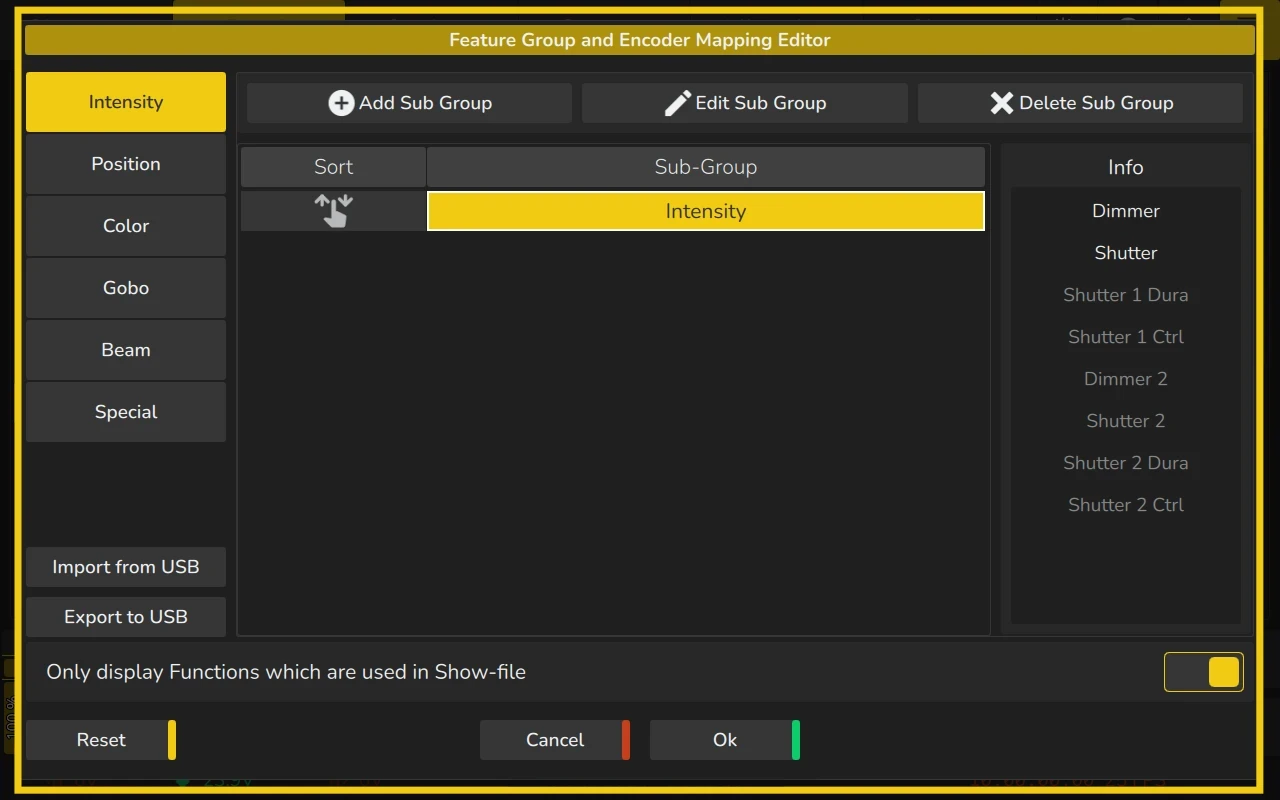
| Add a Sub Group | Is used to add a Subgroup to the selected Feature Group via the "Encoder Mapping Editor for Feature Group" dialog. |
| Edit Sub Group | Is used to edit a Subgroup in the selected Feature Group via the "Encoder Mapping Editor for Feature Group" dialog. |
| Delete Sub Group | Is used to delete a Subgroup in the selected Feature Group. |
| Import from USB | Is used to import a Feature Group from USB. The Group must be stored in the edge/feature_group_import_export directory. |
| Export to USB | Is used to export a Feature Group from USB. The Group will be stored in the edge/feature_group_import_export directory. |
| Reset | Is used to reset all Feature Groups and their Sub Groups to the default version. |
| Cancel | Is used to dismiss all changes and close the Feature Group Editor. |
| Ok | Is used to save all changes and close the Feature Group Editor. |
Encoder Mapping Editor for the Feature Group
The “Encoder Mapping Editor for Feature Group” dialog will open whether you wish to add a new Sub Group or edit an existing one,
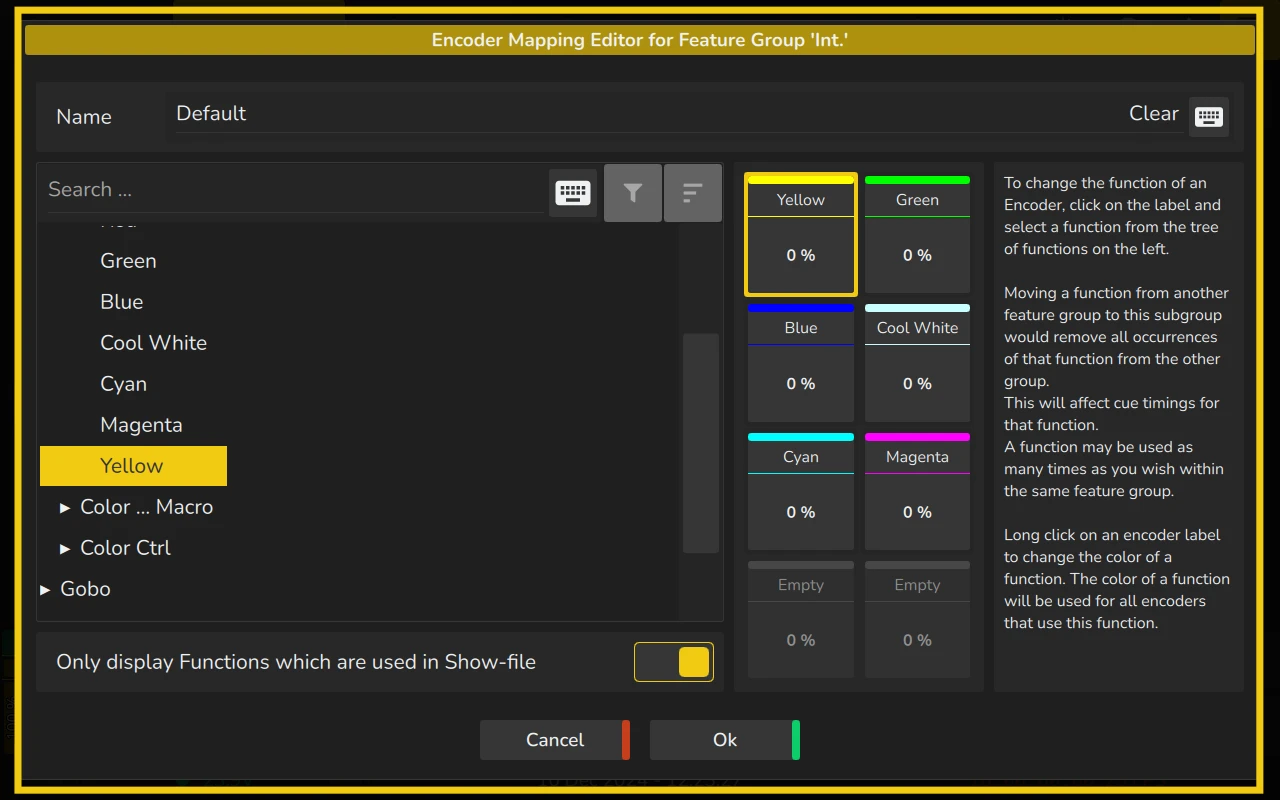
In the Feature Group Editor dialog, you can change the name of the feature group using the On-Screen or USB keyboard. The On-Screen Switch at the bottom of the dialog allows you to filter and display only the functions that are currently used in the showfile.
On the left side of the dialog, you'll find a tree structure of functions to choose from. To the right, you’ll see the encoder labels. To assign a function to an encoder, simply click on the label and select the desired function from the function tree.
If you move a function from one feature group to another, it will be removed from its original group. This can impact cue timings for that function. However, a function can be assigned multiple times within the same feature group.
By long-clicking on an encoder label, you can open a new window that allows you to change the color of a function. The selected color will be applied to all encoders using that function.
Once you've made your changes, click Ok to save them. If you wish to discard any recent changes, click Cancel.

5.2.9 Import Patch from CSV
EDGE allows you to import and re-import CSV files. You will find the Import Patch CSV button by clicking on the Magic Wand Button in the top toolbar.
Importing a new Patch and Fixtures from CSV
EDGE allows you to import fixtures and their patch settings directly from CSV files. The CSV can use either commas (,) or semicolons (;) as delimiters. Strings wrapped in quotes are also supported. Since not all software uses the same column names or order, you can manually map columns during the import process. But keep in mind that in order to successfully import a Patch into the Showfile the CSV file should include, at least, the following information:
- Fixture ID: Shows the ID of the fixture. This corresponds to the "Unit" column in CSV exports from Capture or other software.
- Fixture Type: A combination of Manufacturer and Type.
- Fixture Mode: Specifies the fixture’s mode.
- Patch: Can either be in a single column (e.g.
Universe.Address) or split into two columns (UniverseandAddress). The Universe number can be numerical or alphanumerical (both are supported).
How to Import a Patch into the Showfile
EdgeGo is compatible only with USB sticks formatted in FAT32 with a maximum size of 32GB.
If your USB stick is larger, create a partition and format one partition in FAT32 with a size below 32GB.
- Ensure the CSV file contains the minimum required information (listed above) and that the file extension is
.csv. If the file is delivered in a.zipformat, unzip it first. - Copy the CSV file to the
edge/patch_import_exportfolder or onto a USB stick. Make sure theedgefolder is located in the root of your USB key. - Open the Menu
- Change to the Patch tab.
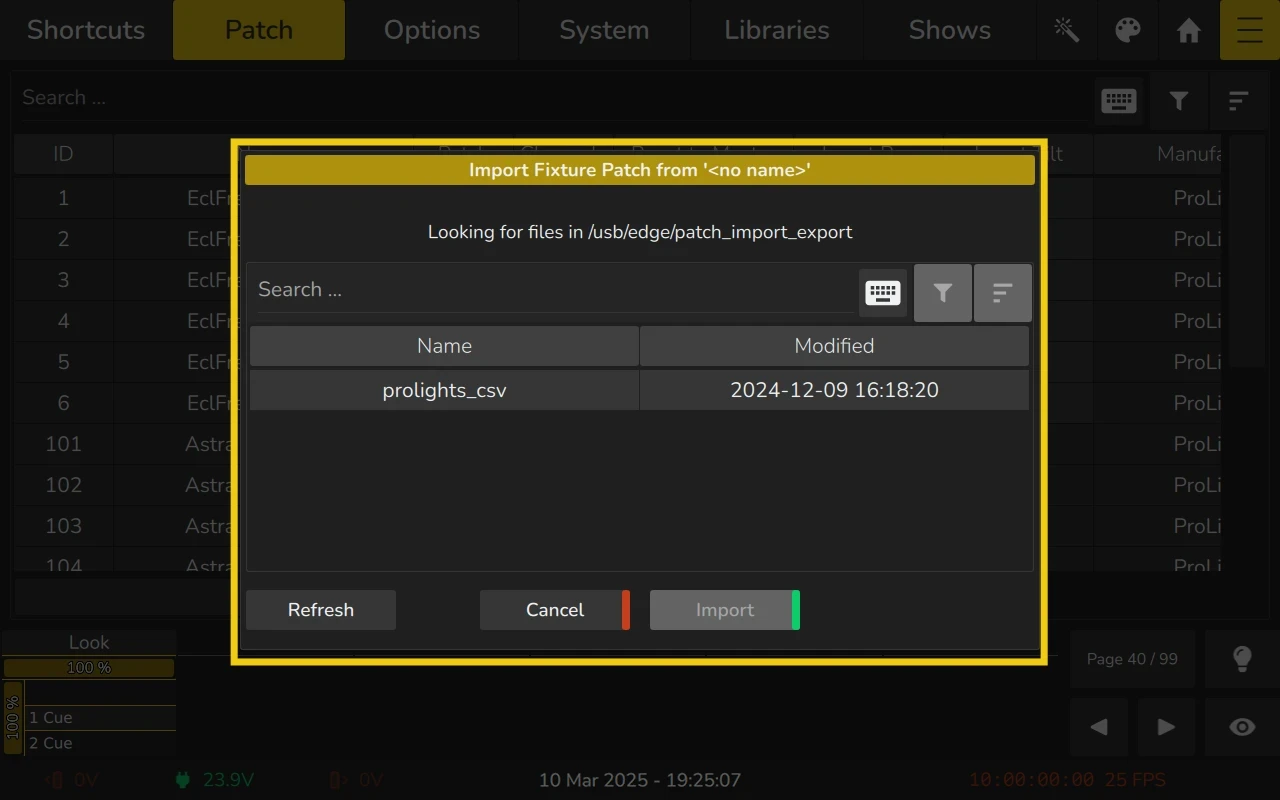
- Click on the Magic Wand button and select Import Patch from CSV.
- The ‘Import Fixture Patch From’ dialog will open and will display the CSV Patch files from the USB Stick.
You select the file or use the search bar to find it. Once selected click on Import.
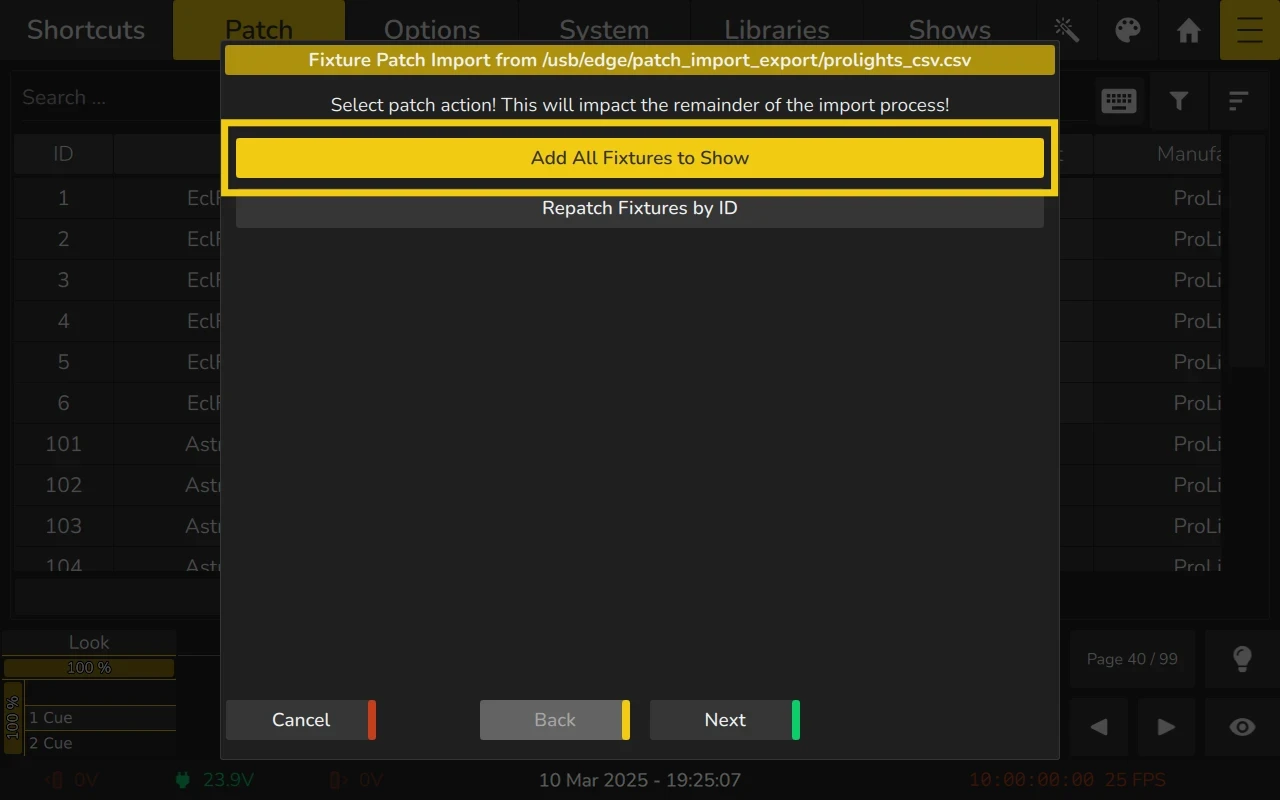
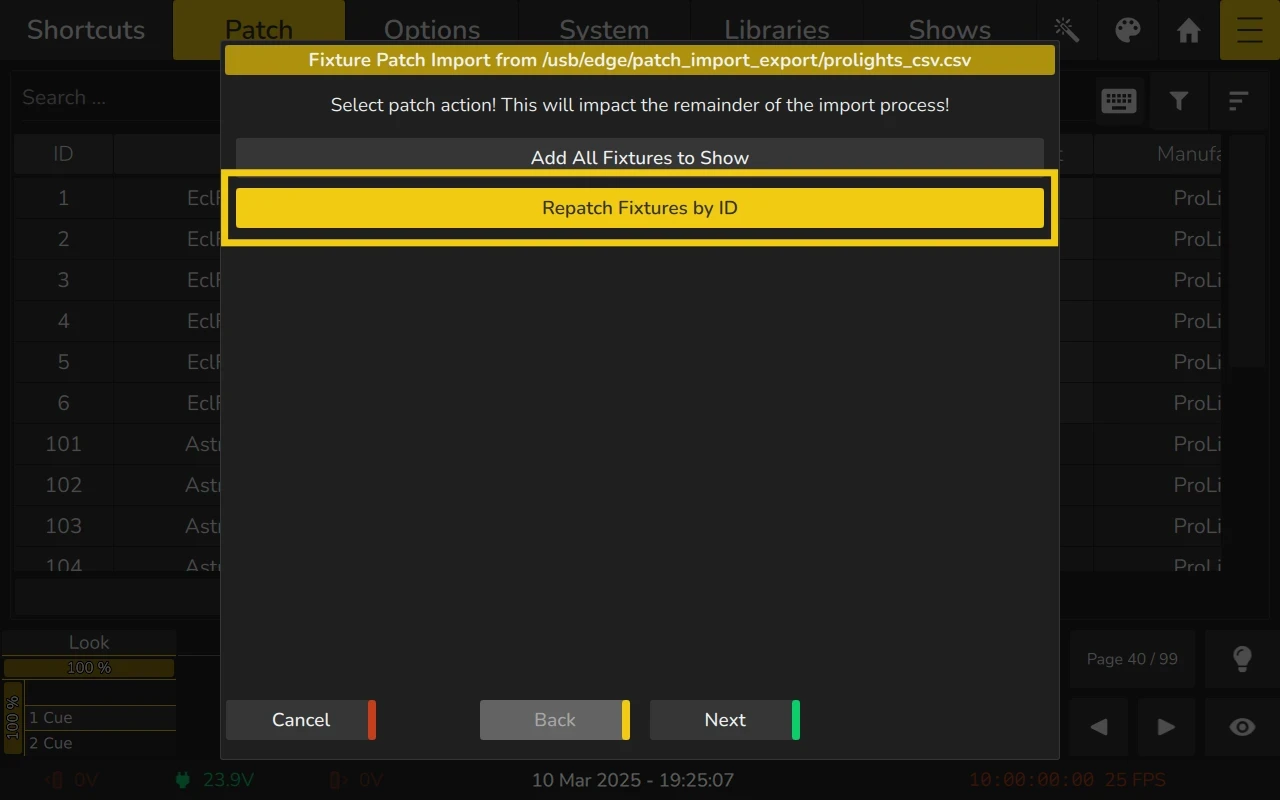
- The next dialog will allow you to decide the import patch action. Click on Add All Fixtures to Show to add everything that is in the CSV Patch file to the Showfile.
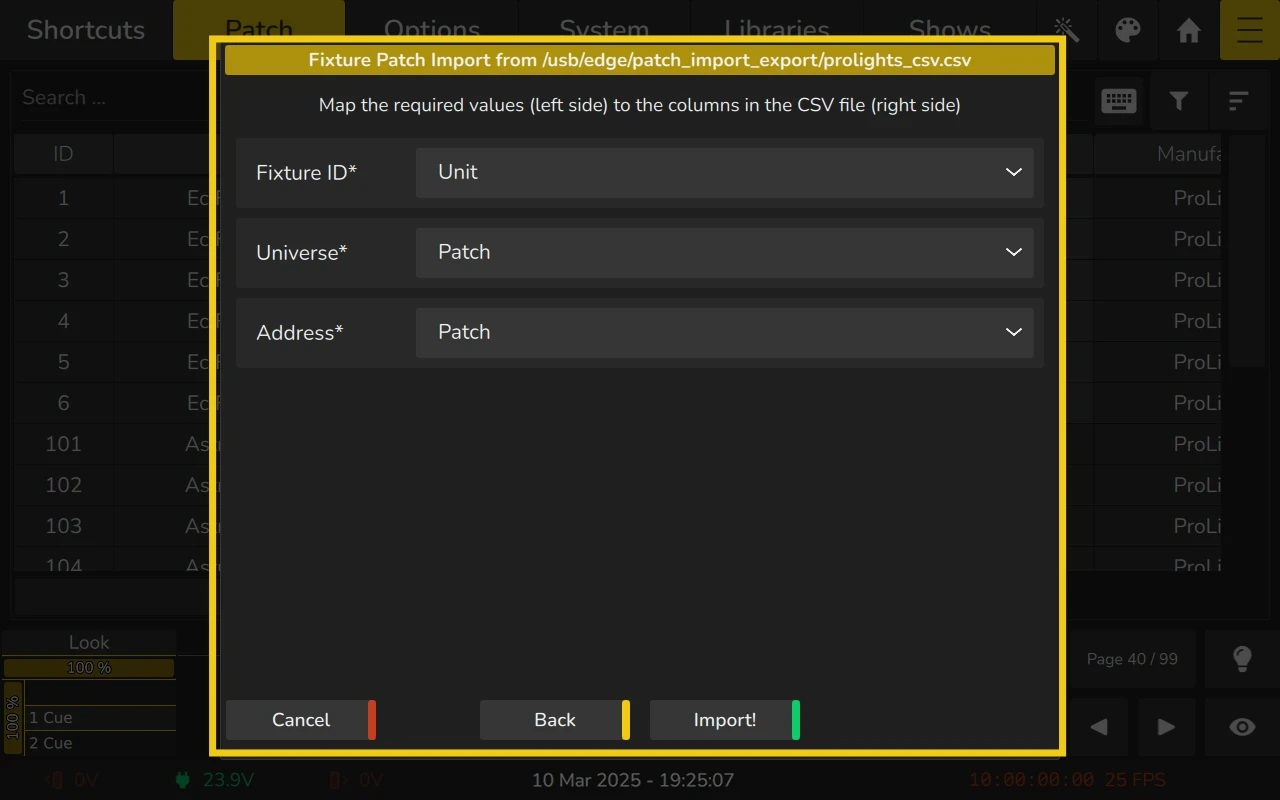
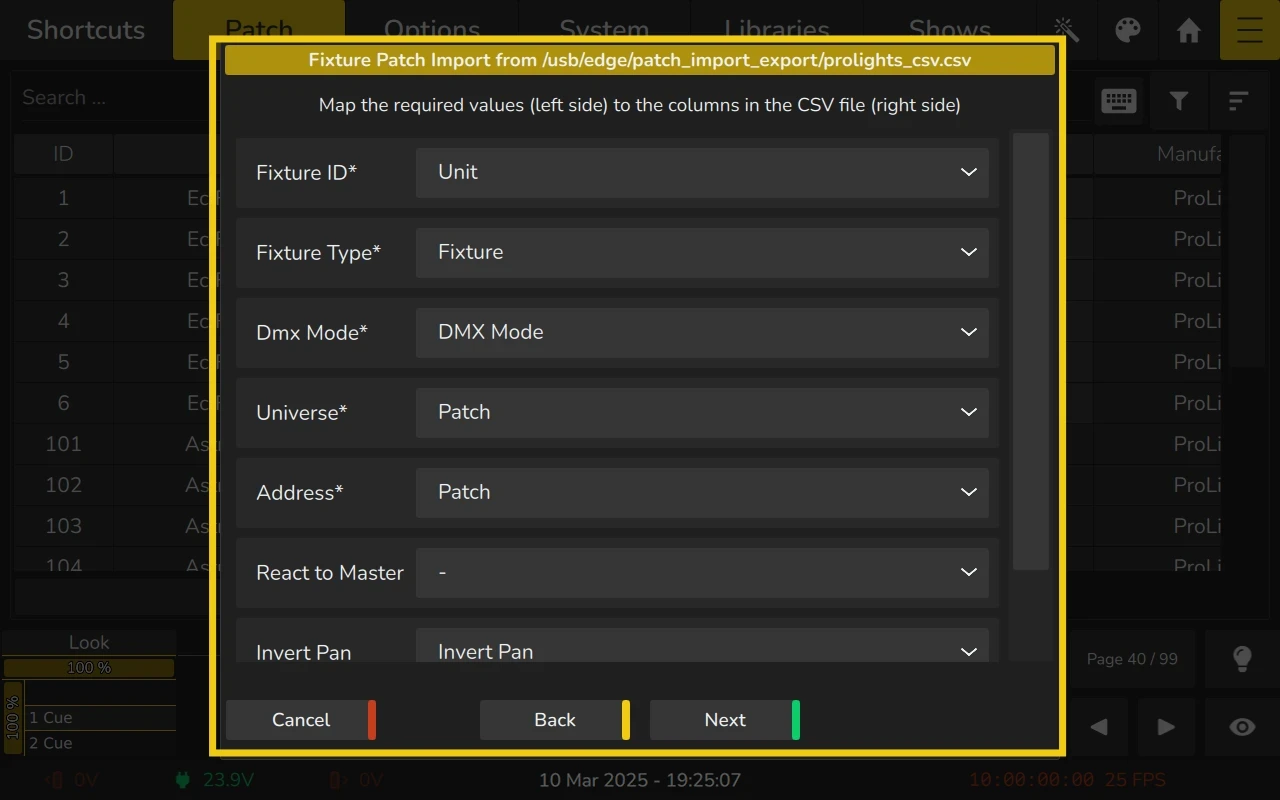
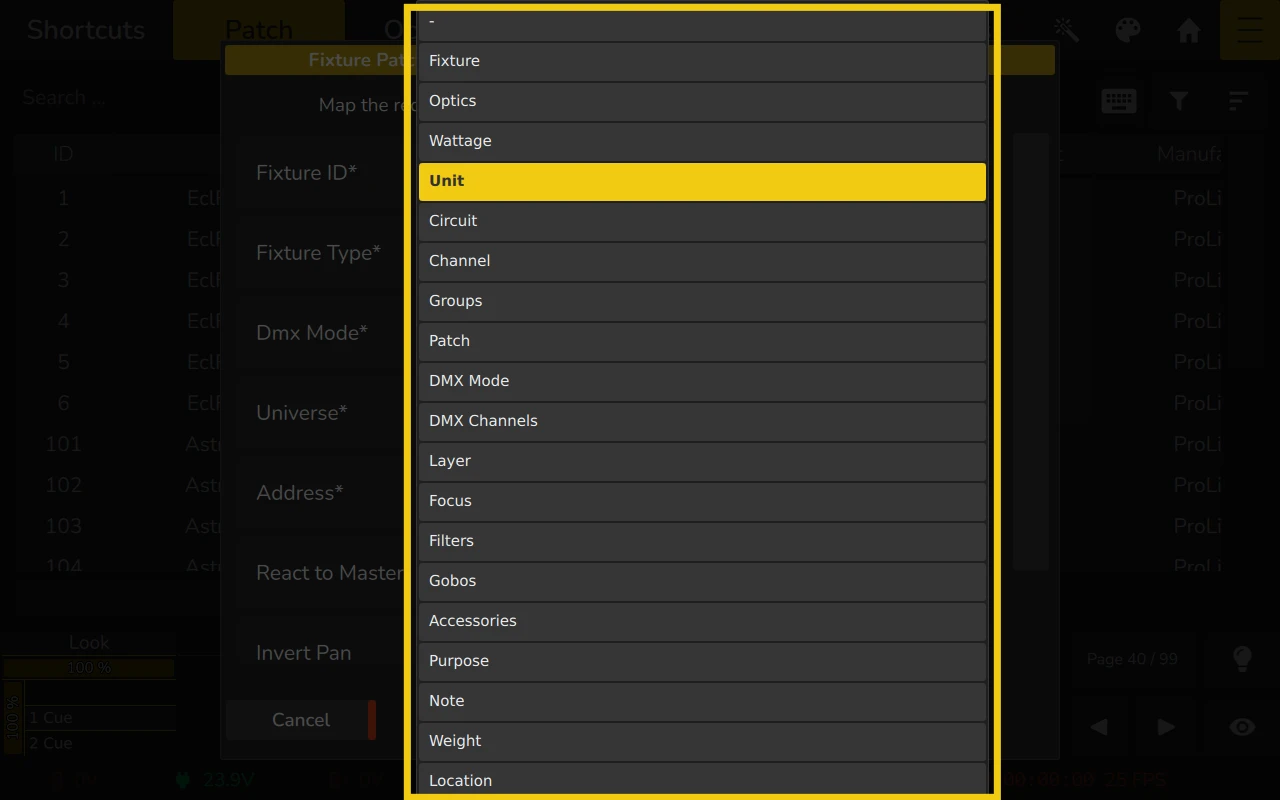
- Next the dialog will allow you to manually do the Mapping between the Patch table columns and the information contained in the CSV file. The information with an asterisk is mandatory. If there is any doubt regarding which info corresponds to which item on the Patch table you can select the empty option from the list. Once the mapping is done, click Next.
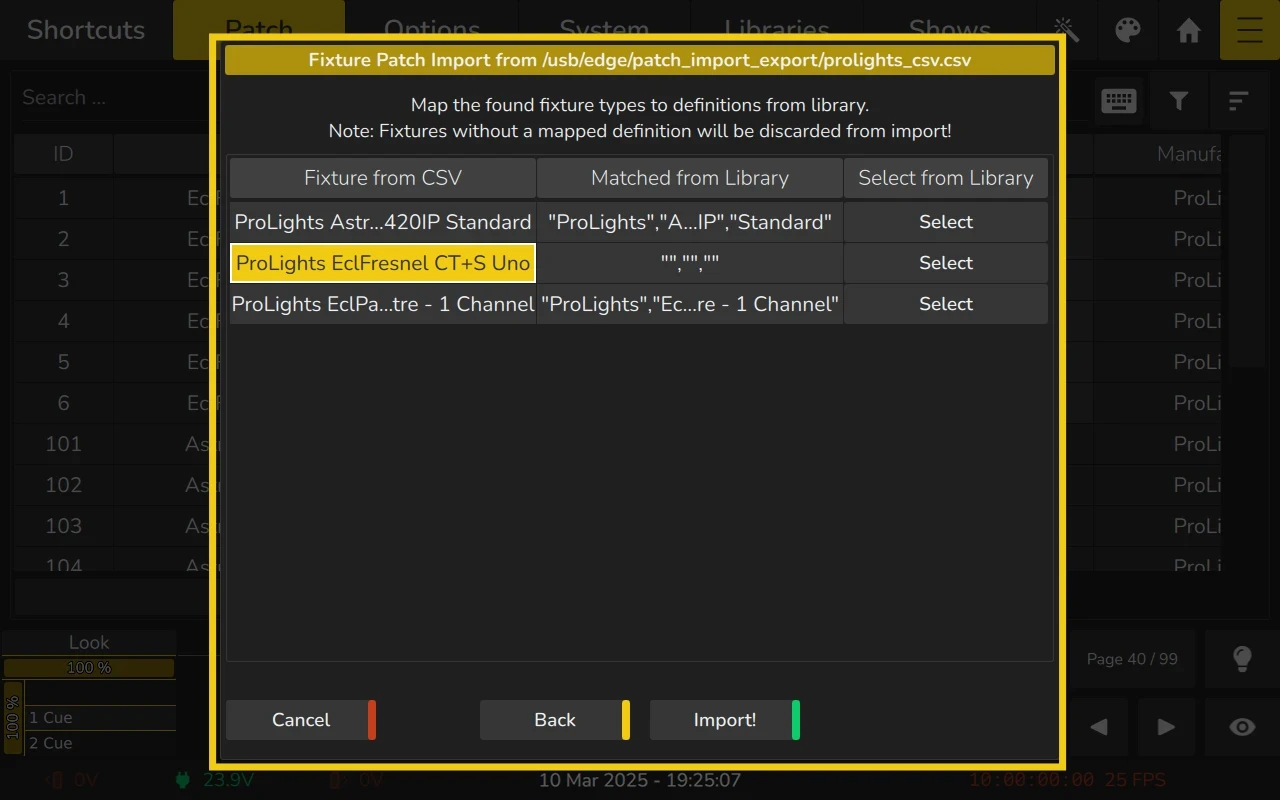
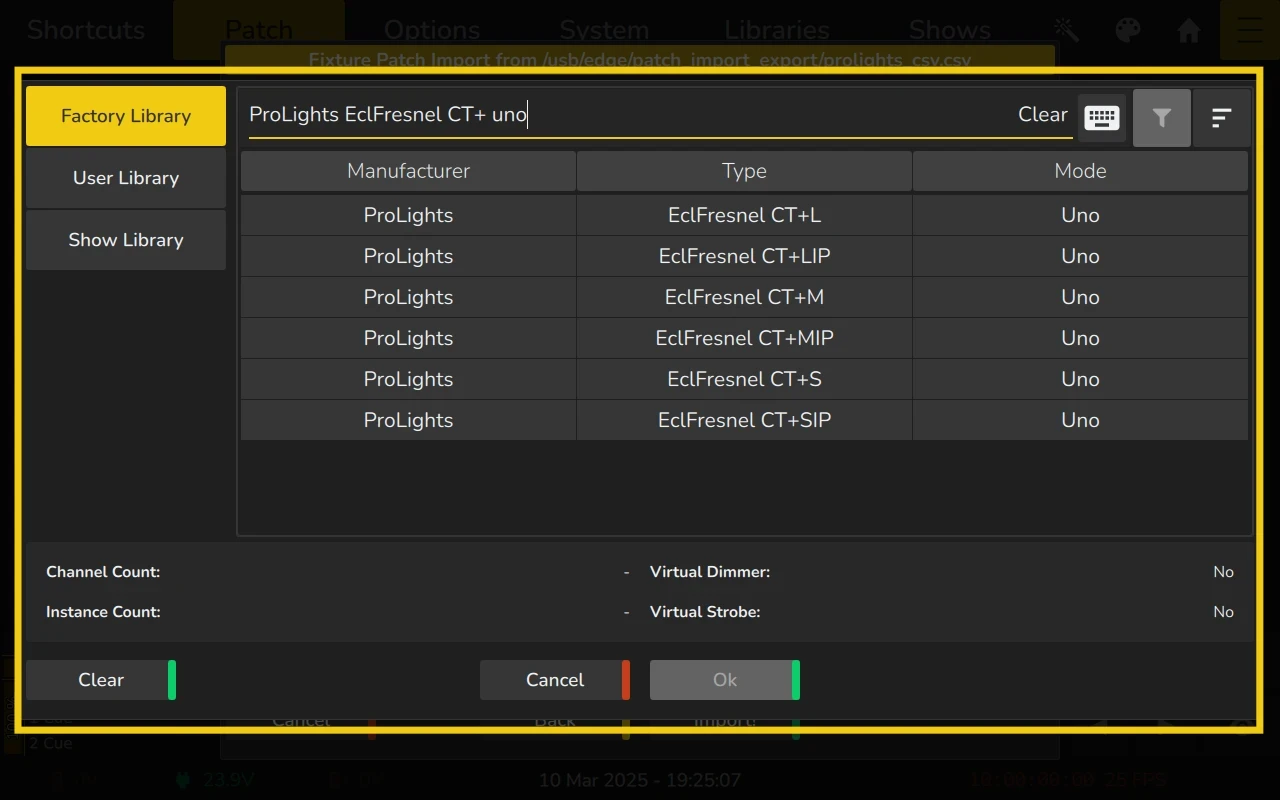
- The next dialog will show a table with a list of the found fixtures type on the CSV file matched to definitions in the Fixture Library. Please check the information carefully and if any of this is not accurate use the Select button on the left column to open the Fixture Library. The console will automatically paste the Fixture Type from the CSV file onto the Library search bar to help with the process. Select the correct mode and click Ok. Once you checked and mapped all the fixtures, click on Import!.
- A confirmation dialog will appear, click on Ok to finish.
Repatching current Fixtures from CSV
EDGE allows you to re-patch fixtures directly from CSV files. This option comes in use when you have already Patched Fixtures to your showfile and need to update all DMX addresses according to the venue’s Patch.
Since not all software uses the same column names or order, you can manually map columns during the import process. But keep in mind that in order to successfully re-patch fixtures into the Showfile the CSV file should include, at least, the following information:
- Fixture ID: This column shows the ID of the fixture. This corresponds to the 'Unit' column in CSV exports from Capture or similar software.
- Patch: This can either be in one column (e.g. Universe.Address) or separated into two columns: Universe and Address. The Universe number can be numeric or alpha-numeric (both are supported).
The CSV file can use either commas (,) or semicolons (;) as delimiters. Strings wrapped in quotes are also supported.
To Re Patch fixtures in your Showfile via CSV file you may proceed as follows:
EdgeGo is compatible only with USB sticks formatted in FAT32 with a maximum size of 32GB.
If your USB stick is larger, create a partition and format one partition in FAT32 with a size below 32GB.
- Make sure the CSV file contains the minimum required information (see above) and the file ending is
.csv. If the file is delivered in zip format, unzip it first. - Copy the CSV file to the
edge/patch_import_exportfolder or on a USB Stick. Make sure theedgefolder is located in the root of your USB key. - Open the Menu.
- Change to the Patch tab.
- On the Patch Toolbar, click on Import Patch
- The "Import Repatch from CSV" dialog will open and will display the CSV Patch files from the USB Stick. You select the file or use the search bar to find it. Once selected, click on Import.

- The next dialog will allow you to decide the import patch action. Click on Repatch fixtures by ID. This option will look at all the fixtures ID numbers of the existing Patch and give them a new address from the file updating the DMX addresses of the fixtures.
- The next dialog will allow you to manually do the Mapping between the Patch table columns and the information contained in the CSV file. The information with an asterisk is mandatory. Once you are done with the mapping, click Import!.